해리의 데브로그

Laravel 5.7 From Scratch 01 - Basic Routing / Blade Layout Files

|

1. Basic Routing

php artisan : 라라벨 프로젝트에서 사용할 수 있는 명령어

php artisan serve : run development server

  • Routes/web.php - route(url 경로) 지정
  • Resources/views/ - router로 연결된 view 파일 생성
// routes/web.php
<?php

Route::get('/', function () {
    return view('welcome');
});

Route::get('/contact', function () {
    return view('contact');
});

// resources/views/welcome.blade.php & contact.blade.php
<body>
    <h1>here we go</h1>
    <p>
        <a href="/contact">Contact </a> us to learn more.
    </p>
</body>
</html>

2. Blade Layout Files

layout.blade.php 를 views 디렉토리 내에 생성하여 공통적으로 쓰이는 base template으로 사용할 수 있음. 다른 템플릿들은 @yield() 내 입력된 스트링을 통해 layout.blad.php을 상속 받을 수 있음.

  • @extends('base template 경로')
  • @section('') @endsection : @yield('') 내 입력된 스트링을 입력
<!-- layout.blade.php -->
<!doctype html>
<html lang="en">
<head>
    <title>@yield('title', 'laracasts')</title>
</head>
<body>

    <ul>
        <li><a href="/">Home</a></li>
        <li><a href="/about">About Us </a></li>
        <li><a href="/contact">Contact </a> us to learn more.</li>
    </ul>
    @yield('content')
</body>
</html>

<!-- welcome.blade.php -->
@extends('layout')@section('content')
    <h1>My First Website!!!!!!</h1>
@endsection

@yield() 의 두번째 인자로 default 값을 설정할 수 있으며, template을 상속받아 입력하는 내용이 길지 않다면 마찬가지로 @section()의 두번째 인자로, 입력 값을 간단하게 입력 할 수 도 있음.

//layout.blade.php
<head>
    <title>@yield('title', 'laracasts')</title>
</head>

// about.blade.php
@section('title', 'about')

생활 코딩 PHP 08 - Database

|

1. DATABASE

1.1 GET STARTED

일반적으로 데이터를 저장해야 하는 에플리케이션을 구축하는 경우 데이터는 데이터베이스 서버에 저장한다. PHP 에플리케이션의 코드에는 데이터베이스 서버에 접속해서 데이터를 조회/수정/삭제하는 코드를 작성한다.

PHP 에플리케이션이 호출되면 PHP 엔진은 PHP 에플리케이션의 코드에 따라서 데이터베이스의 클라이언트가 되어서 데이터베이스에 접속해서 여러가지 작업을 처리한다.

https://opentutorials.org/course/62/5175

  • C:\Bitnami\wampstack-7.3.11-0\mysql\mysql.exe로 MySQL Cllient인 MySQL Monitor 실행 가능(cmd로 실행)
  • 해당 디렉토리가 아니더라도 편하게 mysql을 실행할 수 있도록 환경변수 추가(bin까지의 경로)
  • mysql -u root -p111111 -hlocalhost
    • mysql : mysql.exe를 실행
    • -u , -p , -h : 각각 유저, 패스워드, 호스트를 의미
C:\Bitnami\wampstack-7.3.11-0\mysql\bin>mysql -uroot -p111111 -hlocalhost
mysql: [Warning] Using a password on the command line interface can be insecure.
Welcome to the MySQL monitor.  Commands end with ; or \g.
Your MySQL connection id is 9
Server version: 8.0.18 MySQL Community Server - GPL

1.2 Database, Table 제어

  • CREATE DATABASE DB 이름 : 데이터 베이스 생성
  • show databases : 데이터 베이스 리스트 불러오기
  • use DB명 : 해당 DB로 이동
  • CREATE TABLE : 스키마 생성.
  • show tables : 테이블 리스트 불러옴.
  • desc 테이블명 : 테이블의 스키마 불러옴.
CREATE DATABASE opentutorials CHARACTER SET utf8 COLLATE utf8_general_ci;
show databases;
use opentutorials;

CREATE TABLE topic (
 id int(11) NOT NULL AUTO_INCREMENT,
 title varchar(255) NOT NULL ,
 description text NULL ,
 created datetime NOT NULL ,
 PRIMARY KEY (id)
);

show tables;
desc topic;

1.3 Database CRUD

  • insert , update , delete , select
#DB 삽입
INSERT INTO topic (title, description, created) VALUES('htiml', 'html이란 무엇인가?', now()); 
INSERT INTO topic (title, description, created) VALUES('css', 'html 꾸며주는 언어', now());

#DB 조회
SELECT * FROM topic; #all
SELECT id, title, created FROM topic;
SELECT * FROM topic WHERE id=2;
SELECT * FROM topic where id=1 OR id=2;
SELECT * FROM topic ORDER BY id DESC;

#DB 수정
UPDATE topic SET title='case cading style sheet', description='아름다운 언어' WHERE id=2;

#DB 삭제
DELETE FROM topic where id=2;

2. PHP와 MySQL 확장

  • PHP의 MySQL 확장 기능은 PHP 5.5부터 폐지되었음.

  • 폼태그로 내용을 작성한 후, process.php로 POST 방식으로 작성된 데이터를 전송

<!DOCTYPE html>
<html>
    <head>
        <meta charset="utf-8"/>
    </head>   
    <body>
        <form action="./process.php?mode=insert" method="POST">
            <p>제목 : <input type="text" name="title"></p>
            <p>본문 : <textarea name="description" id="" cols="30" rows="10">
                </textarea></p>
            <p><input type="submit" /></p>            
        </form>
    </body>
</html>
  • process.php
<?php
mysql_connect('localhost', 'root', '111111'); #인자: host, username, password
mysql_select_db('opentutorials'); # use open tutoriarls

#switch는 조건문. switch()값이 case의 값과 일치할 경우 아래 코드 실행. (반드시 break 걸어줄 것)
switch($_GET['mode']){
    case 'insert':
    $result = mysql_query("INSERT INTO topic (title, description, created) VALUES ('".mysql_real_escape_string($_POST['title'])."', '".mysql_real_escape_string($_POST['description'])."', now())");
    header("Location: list.php"); #redirect
    break;
    case 'delete':
    mysql_query('DELETE FROM topic WHERE id = '.mysql_real_escape_string($_POST['id']));
    header("Location: list.php"); 
    break;
    case 'modify':
    mysql_query('UPDATE topic SET title = "'.mysql_real_escape_string($_POST['title']).'", description = "'.mysql_real_escape_string($_POST['description']).'" WHERE id = '.mysql_real_escape_string($_POST['id']));
    header("Location: list.php?id={$_POST['id']}");
    break;
   }

#switch 조건문을 if로 대체했을 경우 아래와 같은 형태로 변경됨,
if($_GET['mode'] === 'insert'){
    $result = mysql_query("INSERT INTO topic (title, description, created) VALUES ('".mysql_real_escape_string($_POST['title'])."', '".mysql_real_escape_string($_POST['description'])."', now())");
    header("Location: list.php"); 
} else if ($_GET['mode'] === 'delete'){
    mysql_query('DELETE FROM topic WHERE id = '.mysql_real_escape_string($_POST['id']));
    header("Location: list.php"); 
} else if ($_GET['mode'] === 'modify'){
    mysql_query('UPDATE topic SET title = "'.mysql_real_escape_string($_POST['title']).'", description = "'.mysql_real_escape_string($_POST['description']).'" WHERE id = '.mysql_real_escape_string($_POST['id']));
    header("Location: list.php?id={$_POST['id']}");
}
?>

3. PHP와 PDO

PDO(PHP Data Objects)란 여러가지 데이터베이스를 제어하는 방법을 표준화시킨 것이다. 데이터베이스는 다양한 종류가 있다. 그리고 종류에 따라서 서로 다른 드라이브를 사용해 왔는데 드라이브의 종류에 따라서 데이터베이스를 제어하기 위한 API가 달랐다. PDO를 사용하면 동일한 방법으로 데이터베이스를 제어할 수 있다.

https://opentutorials.org/course/62/5155

3-1. process.php

<?php
#pdo 객체 생성 & DB 접속. host, username, password 순으로 PDO 인자 입력. 
$dbh = new PDO('mysql:host=localhost;dbname=opentutorials', 'root', '111111', array(PDO::MYSQL_ATTR_INIT_COMMAND => "SET NAMES utf8"));

switch($_GET['mode']){
    case 'insert': #데이터 추가

        #쿼리를 담은 PDO stmt(statement) 객체 생성
        #PDO를 사용하면 준비구문(prepare statements)를 활용할 수 있음
        #준비 구문 => SQL 인젝션 공격 방어 가능, 어플 성능 향상 
        $stmt = $dbh->prepare("INSERT INTO topic (title, description, created) VALUES (:title, :description, now())");
        
        # PDO stmt 객체가 가진 쿼리 파라미터에 변수를 바인딩
        $stmt->bindParam(':title',$title);
        $stmt->bindParam(':description',$description); 
        $title = $_POST['title'];
        $description = $_POST['description'];
        
        $stmt->execute(); # PDO stmt 객체가 가진 쿼리 실행
        header("Location: list.php"); # Redirect
        break;
    
    case 'delete': #데이터 삭제
        $stmt = $dbh->prepare('DELETE FROM topic WHERE id = :id');
        $stmt->bindParam(':id', $id);
 
        $id = $_POST['id'];
        $stmt->execute();
        header("Location: list.php"); 
        break;
    
    case 'modify': #데이터 수정
        $stmt = $dbh->prepare('UPDATE topic SET title = :title, description = :description WHERE id = :id');
        $stmt->bindParam(':title', $title);
        $stmt->bindParam(':description', $description);
        $stmt->bindParam(':id', $id);
 
        $title = $_POST['title'];
        $description = $_POST['description'];
        $id = $_POST['id'];
        $stmt->execute();
        header("Location: list.php?id={$_POST['id']}");
        break;
}
?>

3-2. list.php

  • <?= ?><?php echo ?>의 shorthand
<?php
$dbh = new PDO('mysql:host=localhost;dbname=opentutorials', 'root', '111111');
$stmt = $dbh->prepare('SELECT * FROM topic');
$stmt-> execute();
$list = $stmt -> fetchAll(); #한번에 모든 행을 가져올때 사용하는 메서드
if(!empty($_GET['id'])) {
  $stmt = $dbh -> prepare('SELECT * FROM topic WHERE id=:id');
  $stmt->bindParam(':id', $id, PDO::PARAM_INT); #PARAM_INT: SQL INT 데이터 타입을 표현
  $id = $_GET['id'];
  $stmt -> execute();
  $topic = $stmt->fetch();
}
?>
<!DOCTYPE html>
<html>
  <head>
    <meta charset="utf-8" />
    <style type="text/css">
      body {
          font-size: 0.8em;
          font-family: dotum;
          line-height: 1.6em;
      }
      header {
          border-bottom: 1px solid #ccc;
          padding: 20px 0;
      }
      nav {
          float: left;
          margin-right: 20px;
          min-height: 1000px;
          min-width:150px;
          border-right: 1px solid #ccc;
      }
      nav ul {
          list-style: none;
          padding-left: 0;
          padding-right: 20px;
      }
      article {
          float: left;
      }
      .description{
          width:500px;
      }
    </style>
  </head>   
  <body id="body">
    <div>
      <nav>
        <ul>
         <?php
          foreach($list as $row) {
            echo "<li><a href=\"?id={$row['id']}\">".htmlspecialchars($row['title'])."</a></li>";
          }
         ?>
        </ul>
        <ul>
          <li><a href="input.php">추가</a></li>
        </ul>
      </nav>
      <article>
      <?php
      if(!empty($topic)){
      ?>
      <h2><?=htmlspecialchars($topic['title'])?></h2> 
      <div class="description">
        <?=htmlspecialchars($topic['description'])?>
      </div>
      <div>
        <a href="modify.php?id=<?=$topic['id']?>">수정</a>
        <form method="POST" action="process.php?mode=delete">
          <input type="hidden" name="id" value="<?=$topic['id']?>" />
          <input type="submit" value="삭제" />
        </form>
      </div>
      <?php
      }
      ?>
      </article>
    </div>
  </body>
</html>

3-3. modify.php

<?php
$dbh = new PDO('mysql:host=localhost;dbname=opentutorials', 'root', '111111');
$stmt = $dbh->prepare('SELECT * FROM topic WHERE id = :id');
$stmt->bindParam(':id', $id, PDO::PARAM_INT);
$id = $_GET['id'];
$stmt->execute();
$topic = $stmt->fetch();
?>
<!DOCTYPE html>
<html>
    <head>
        <meta charset="utf-8"/>
    </head>   
    <body>
        <form action="./process.php?mode=modify" method="POST">
            <input type="hidden" name="id" value="<?=$topic['id']?>" />
            <p>제목 : <input type="text" name="title" value="<?=htmlspecialchars($topic['title'])?>"></p>
            <p>본문 : <textarea name="description" id="" cols="30" rows="10"><?=htmlspecialchars($topic['description'])?></textarea></p>
            <p><input type="submit" /></p>
        </form>
    </body>
</html>

생활 코딩 PHP 07 - 정규 표현식

|

1. 정규표현식

정규 표현식(正規表現式,Regular Expression)은 문자열을 처리하는 방법 중의 하나로 특정한 조건의 문자를 ‘검색’하거나 ‘치환’하는 과정을 매우 간편하게 처리 할 수 있도록 하는 수단

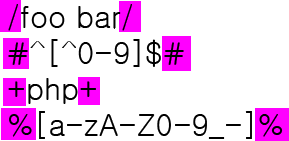
1.1 GET STARTED - 구분자

  • 정규표현식인 부분과 아닌 부분을 구분하기 위해 사용하며 특수부호를 씀.
  • /foo bar/im 에서 im을 pattern modifier이라고 함 (패턴을 동작하는 방법을 수정)
    • i : 대소문자 구분하지 않도록 함
    • m: multiline 각각의 행마다 조건을 적용시킬 때 사용

예시)

  • preg_match : 검새을 수행하고 일치하는 내용을 반환함.
  • 검색이 된다면 1을 반환. 그렇지 않을 경우 0을 반환(문법적인 오류는 false 반환)
<?php
if (preg_match("/php/i", "PHP is the web scripting language of choice.")) {
    echo "A match was found.";
} else {
    echo "A match was not found.";
}
?>

1.2 검색

  • \b : word boundary; 단어의 경계를 의미함. \b로 감싸진 web은 web이라는 독립된 단어를 의미함. website는 web과 site가 결합된 단어이기 때문에 이 조건에 해당하지 않음.
<?php
if (preg_match("/\bweb\b/i", "PHP is the web scripting language of choice.")) {
    echo "A match was found.";
} else {
    echo "A match was not found.";
}
 
if (preg_match("/\bweb\b/i", "PHP is the website scripting language of choice.")) {
    echo "A match was found.";
} else {
    echo "A match was not found.";
}
?>
  • . : any character
<?php
$subject = 'coding everybody http://opentutorials.org egoing@egoing.com 010-0000-0000';
preg_match('/coding/', $subject, $match); 
#preg_match가 검색결과를 3번째 인자(변수; $match)에 저장시킴
print_r($match);
?>

<?php
$subject = 'coding everybody http://opentutorials.org egoing@egoing.com 010-0000-0000';
preg_match('/c...../', $subject, $match); 
print_r($match);
?>
  • 슬러쉬(/)를 써야하는 경우 - escaping & 다른 구분자 사용
<?php #도메인 추출 - 슬러쉬인 /을 넣어야할 경우 \ 사용(escaping) 
$subject = 'coding everybody http://opentutorials.org egoing@egoing.com 010-0000-0000';
preg_match('/http:\/\//', $subject, $match); 
print_r($match);
?>

<?php #도메인 추출 - 슬러쉬인 /을 넣어야할 경우 다른 구분자 사용
$subject = 'coding everybody http://opentutorials.org egoing@egoing.com 010-0000-0000';
preg_match('~http://\w+~', $subject, $match); #w: 문자를 의미 +: 하나이상이라는 수량자
print_r($match);
?>

<?php 
$subject = 'coding everybody http://opentutorials.org egoing@egoing.com 010-0000-0000';
preg_match('~http://\w+.~', $subject, $match); #. : any character
print_r($match);
?>

<?php 
$subject = 'coding everybody http://opentutorials.org egoing@egoing.com 010-0000-0000';
preg_match('~http://\w+\.\w+~', $subject, $match); # any character로 사용되지 않도록 escaping 처리 
print_r($match);
?>
  • 캡쳐링(역참조) : ()로 정규표현식의 패턴을 묶으면 독립된 데이터로 추출할 수 있음
<?php 
$subject = 'coding everybody http://opentutorials.org egoing@egoing.com 010-0000-0000';
preg_match('~(http://\w+\.\w+)\s(\w+@\w+\.\w+)~', $subject, $match); #\s 공백을 의미
print_r($match);
# $match[0] 에는 전체 데이터가 저장되어 있음.
echo $match[1];
echo $match[2];
?>
  • 응용 1)
<?php
preg_match('@^(?:http://)?([^/]+)@i', 
#^  => 경계를 의미함. http://로 시작하는 것을 검사
#?: => matches 라는 배열안에 http:// 가 담기지 않음.
#?  => 수량자: 0~1 http:// 가 없거나 있거나. 1개만 등장
#대괄호 안의 ^ => not(부정)을 의미.  
#[^/] => /가 아닌 전체문자를 의미 (www.php.net)

    "http://www.php.net/index.html", $matches);
print_r($matches);
$host = $matches[1];

// get last two segments of host name
# / => 구분자 
# [^.] => .이 아닌 문자
# + => 수량자(.이 아닌 문자가 1개 이상)
# \. => .을 문자로 처리
# $ => 문자열의 끝에 해당하는 경계
preg_match('/[^.]+\.[^.]+$/', $host, $matches);
print_r($matches);
echo "domain name is: {$matches[0]}\n";
?>
  • 응용 2) - Back Reference
<?php
 
$str = 'foobar: 2008';
 
preg_match('/(?P<name>\w+): (?P<digit>\d+)/', $str, $matches);
 
/* This also works in PHP 5.2.2 (PCRE 7.0) and later, however 
 * the above form is recommended for backwards compatibility */
// preg_match('/(?<name>\w+): (?<digit>\d+)/', $str, $matches);
 
print_r($matches);
 
?>

생활 코딩 PHP 06 - include와 namesapce

|

1. include와 namespace

1-1. include/require

다른 PHP 파일을 코드 안으로 불러와서 사용할 수 있게 함

includerequire은 외부의 php 파일을 로드할 때 사용하는 명령. 두 명령어의 차이는 include는 warning을 일으키며, require은 fatal error를 일으킴. (require이 더 엄격한 기준). _once는 파일을 로드할때 단 한번만 로드시킬때 사용

  • include
  • include_once
  • require
  • require_once
# greeting.php
<?php
function welcome(){
    return 'Hello world';
}
?>
    
#2.php
<?php
include 'greeting.php';
echo welcome();
?>
    

1-2. namespace

디렉토리와 같은 개념으로 하나의 어플리케이션 내에 여러개의 모듈을 사용하면서 같은 이름이 사용될 경우 충돌이 발생 할 수 있음. 이러한 경우 네임스페이스를 지정하여 충돌을 방지함.

아래의 경우 로드한 두개의 파일 모두 welcome 이라는 함수를 선언했기 때문에 중복 선언으로 인하여 에러가 발생함.

# greeting_en.php
<?php
function welcome(){
    return "Hello world";
}
?>

# greeting_kr.php
<?php
function welcome(){
    return "안녕 세계";
}
?>
    
<?php
require_once 'greeting_kr.php';
require_once 'greeting_en.php';
echo welcome();
echo welcome();
?>

Fatal error: Cannot redeclare welcome() (previously declared in C:\Bitnami\wampstack-7.3.11-0\apache2\htdocs\include\greeting_kr.php:3) in C:\Bitnami\wampstack-7.3.11-0\apache2\htdocs\include\greeting_en.php on line 3

아래와 같이 네임스페이스를 설정하여 함수 중복 선언에러를 방지할 수 있음.

<?php
namespace language\en;
function welcome(){
    return "Hello world";
}
?>

<?php
namespace language\kr;
function welcome(){
    return "안녕 세계";
}
?>

<?php
require_once 'greeting_kr.php';
require_once 'greeting_en.php';
echo language\kr\welcome();
echo language\en\welcome();
?>

하나의 단일 파일 내에서도 여러개의 네임스페이스를 지정할 수 있음.

#greeting_all.php
<?php
namespace language\en\rev;
function welcome() {
    return 'Hello world';
}

namespace language\ko\rev;
function welcome() {
    return "안녕 세계";
}
?>

#4.php
<?php
require_once 'greeting_all.php';
echo language\en\rev\welcome();
echo language\ko\rev\welcome();
?>

생활 코딩 PHP 05 - 함수, 배열

|

1. 함수

1-1. 기본 문법

  • 함수의 형식
function 함수명( [인자...[,인자]] ){
   코드
   return 반환값;
}
  • 함수의 정의와 호출
<?php
function numbering(){
    $i = 0;
    while ($i < 10){
        echo $i;
        $i += 1;
    }
}
numbering();
?>

1-2. 입력과 출력

  • return: 출력
  • 함수의 인자로 입력값을 받을 수 있으며, 복수의 인자도 입력 가능
<?php
function get_arguments($arg1, $arg2){
    $arg3 = $arg1 + $arg2;
    return $arg3;
}
echo get_arguments(10, 20);
?>

1-3. 인자의 기본값

  • 키워드 인자로 인자의 기본값 설정 가능
<?php
function get_arguments($args1=100){
    return $args1;
}
echo get_arguments(15);
echo get_arguments();
?>

2. 배열

2-1. 배열의 생성

<?php
$member = ['harry', 'potter', 'ron'];
$member2 = array('harry', 'potter', 'ron'); #php 5.4 이전 버전
echo $member[0];
echo $member[1];
echo $member2[2];
?>

<?php
function get_members(){
    return ["harry", "ron", "sally"];
}
$tmp = get_members();
echo $tmp[1];
echo get_members()[0]; #php 5.4 이상 버전에서 사용 가능
?>

2-2. 배열의 사용(반복문)

  • count() : 배열의 길이 반환
  • ucfirst() : string의 첫번째 문자를 대문자로 변경
<?php
function get_members(){
    return ['harry', 'ron', 'micheal', 'tom'];
}
$members = get_members();

for ($i=0; $i < count($members); $i++){
    echo ucfirst($members[$i])."<br />";
}
?>

2-3. 배열의 제어 - 삽입

  • count: 배열의 크기 확인
  • array_push(배열명, 데이터) : 배열의 끝에 1개의 데이터 추가
  • array_merge(배열명, 복수의데이터) : 배열의 끝에 여러개의 데이터(배열) 추가. 이때 변수의 값으로 덮어씌어줄 것
  • array_unshift : 배열의 제일 앞에 데이터 추가
  • array_splice() : 배열 자르기 및 중간에 추가
<?php
$tmp = [1,2,3,4,5];
echo count($tmp);
?>
<br />

<?php
$li = ['a', 'b', 'c', 'd', 'e'];
array_push($li, 'f'); # $li 배열의 끝에 'f' 추가
var_dump($li);
?>
<br />

<?php
$li2 = ['f', 'g', 'h', 'i'];
$li2 = array_merge($li2, ['j', 'k']); # 여러개의 데이터 추가
var_dump($li2);
?>
<br />

<?php
$li3 = ['l','m','n'];
array_unshift($li3, 'z'); # 배열의 제일 앞에 추가
var_dump($li3);
?>
<br />

<?php
$li = ['a','b','c','d','e'];
array_splice($li, 2, 0, 'B'); #  2번째 인덱스 뒤에 'B' 삽입
var_dump($li);
?>

2-4. 배열의 제어 - 제거

  • array_pop : 배열의 제일 끝 데이터 제거
  • array_shift : 배열의 첫 데이터 제거
<?php
$li = ['a','b','c','d','e'];
array_pop($li);
var_dump($li); # e 제거
array_shift($li); 
var_dump($li); # a 제거
?>

2-5. 배열의 제어 - 정렬

  • sort : 정렬
  • rsort : 역순으로 정렬
<?php
$li = ['c', 'a', 'b', 'z' , 'f'];
sort($li); #정렬
var_dump($li);
rsort($li); #역순으로 정렬
var_dump($li);
?>

3. 연관배열(Aassociative Array)

  • 배열의 식별자(인덱스)로 숫자가 아니라 문자를 사용(Python의 Dictionary와 매우 유사한 자료 구조)
  • array()=>를 조합하여 생성. 혹은 Python Dict처럼 key, value값을 입력 가능
  • 열거 할 경우, foreach 사용
    • for은 숫자를 기반으로 사용 가능. 문자기반인 연관배열에서는 foreach 사용
<?php
$grades = array('harry'=>10, 'potter'=>6, 'Ron'=>80);
var_dump($grades);

$grades1 = [];
$grades1['harry'] = 10;
$grades1['potter'] = 6;
$grades1['Ron'] = 5;
var_dump($grades1);
echo $grades1['Ron'];
?>
<br />

<?php
$grades2 = array('harry'=>10, 'potter'=>5, 'malpoe'=>20);
var_dump($grades2);
foreach($grades2 as $key => $value){
    echo "key:{$key} value: {$value}<br />";
}
?>